Accepting Cryptocurrency

February 10, 2021 at 10:41 pm | Posted in Backup, Economoney, Software | 1 Comment
Tags: , , ,

I’ve had some requests to accept digital currency on my other WordPress site. When I last looked, this was a rather challenging proposition. But I discovered it’s now much more straightforward.

Cryptocurrency is a huge topic. It’s like combining the stock market with international currency exchange and international trade. Uniquely though, it’s decentralized, distributed, very secure, and transactions are all public (but not identities).

I’m just a beginner but I thought it worth sharing what I’ve learned for others in a similar place. There’s lots of conflicting opinions out there.

First, you need a “digital wallet” to hold your funds.

The most secure is a hardware device you plug in via USB.
Devices by Ledger and Trezor are recommended.

But this is premature for getting started. It’s simpler to start with a software digital wallet.

Careful with online trading accounts as you may not control your private key and can be totally dependent on them for your funds and security. No bank insurance.

For a desktop computer, simplest may be an app that handles a single currency, like the recommended Electrum for BitCoin. However, if you’re going to accept several currencies, it’s more straightforward to use one app that handles all your currencies in one wallet and allows easy transferring between them.

I settled on Atomic Wallet. During setup, you’ll be asked to make note of your seed phrase. This is a way to recover your private key and restore funds in the event of a computer problem. Don’t skip this.

Sending and receiving digital funds is free. Exchanging and purchasing coin can be more costly within the app but is also more straightforward and avoids third-party risks. In the upper right is a button to a settings screen that allows you to turn off the currencies you’re not interested in now.

Another recommended option is the similar Exodus. They have a partnership with Trezor, making migrating to hardware later more straightforward. They also have a mobile wallet. The software has fewer features than Atomic and their support pages were lacking.

For iPhone and Android, Trust Wallet or Exodus (above) are recommended, though I’ve not tried them. Evidently Atomic will soon have a mobile app too.

Advantages of a cell app include having the wallet with you and using QR code scans to get wallet addresses rather than copy-paste. The big disadvantage is increased vulnerability, so take care with security settings.

With a digital wallet up and running, you can now exchange digital currency!

The key with any wallet is recognizing your data has monetary value. You need:

1) A password manager. Your wallet needs a strong password that’s hard to remember. You don’t want to lose your funds. And there is no central authority that can restore your password.

This is also a good place to store your Seed Phrase (private key) securely so you can recover your wallet.

2) A backup. While your wallet data is encrypted and stored decentrally online, your access to that is in your wallet. Again, you don’t want to lose that.

After you’ve chosen and installed a wallet, your second step is to offer it to the world. That needs a WordPress plugin. The Cryptocurrency Donation Box was just the ticket.

After installing and activating the plugin, you add your wallets public addresses for each coin you want to offer.

In Atomic, click the currency and click Receive and it will show the public “address” of your wallet for that currency. Click Copy, then paste that into the plugin for that currency.

A few popular ones should do it. Save. On Settings, you may want to tweak the Description.

Finally, just paste the Shortcode into the Page where you want it to show up. I used the tabular one, as shown at the top of the plugins description page.

Now you can accept digital currency on your WordPress site. The user copies your address, pastes it into their wallet, adds an amount, and clicks Send. In a few minutes, it shows up in yours. Easier than PayPal.

Like to know more? A very simple introduction to Bitcoin:

On YouTube

An overview of the implications:

On YouTube

David

Smart Homes

July 20, 2018 at 11:39 am | Posted in Economoney, Security, Software, Technology | Leave a comment
Tags: , , ,

Modern “Smart” technology is a wonderful thing. Smart phones do vastly more than just make telephone calls. They give you information power unheard of until recently. That technology has also moved forward into TV’s, household appliances, and “personal assistants.”

However, the technology has also picked up bad habits. Many web sites exchanged free applications for your usage data and demographics for targeted marketing. This is the operating principle of Facebook, for example. Google picked this up then it migrated onto smart phones in a big way. Some applications use your paid monthly data to feed you ads and collect your information. It’s hard to find applications that don’t track you now. Even simple things like flashlights want to track your browsing history, calling history, and more. Pay attention to those permissions.

Ah, not a big deal you say – I give up a little privacy in exchange for convenience. Yet most people do not understand how much information is being collected about them,  from how many devices, and how it skews their world-view. Companies have been working to aggregate the data from multiple sources too. Now people are paying for “personal assistants” that essentially bug your home. Just who is this smart for?

In a recent TED talk, journalists Kashmir Hill and Surya Mattu describe an experiment they ran. They speak of the ways supposed convenience is used to collect your personal habits and send it to corporations. That data is then used to manipulate you into buying more and is sold to unknown third parties. Your personal life has become a product without you knowing.

Much as companies may plead that no personally identifiable information is being saved, how hard is it to ID you if they also know who bought their products? Just one piece of data like your IP address can connect all the dots. You leave your IP address on every website you visit, sometimes with your contact info, photo, and so forth. If you use a router, your devices use the same IP.

Keep in mind this is being done without your informed consent and your life is being shared with companies you’ve never heard of, often off-shore. This is unregulated territory. Your email address has more protection than your sleep and sex habits.

Smart power meters are a simpler example. Power consumption itself doesn’t give a lot of information about you. But smart meters track patterns of consumption throughout the day. This maps your personal routines in detail. My hydro provider lets me look at my usage graphs and can make surprisingly informed suggestions to save money. But I have less concern about them than I do multinationals with little to no regulatory oversight.

Zeynep Tufekci talked at TED about artificial intelligence and the hazards of unconstrained tracking. For example, even if you don’t log in, YouTube will offer you “suggested” videos. Web sites feed us what they think will keep us there longer. This drifts to extremes, leading into dark corners and a very distorted view of the world. I’ve been surprised by the weirdness YouTube suggests if I watch a few clips, for example. News sites do the same thing in much less obvious ways.

The talk mentions how Facebook’s testing revealed small changes in posts changed the voting behaviour of hundreds of thousands of users. In the US election, this was more than the difference between the parties. And yet the vast majority of users don’t realize they’re being manipulated this way. Confirmation bias is unconscious.

Minimizing our use of biased platforms can help. Balanced news sources, non-tracking search engines, browser plug-ins that reduce tracking, and similar tools can help us get a more neutral view. But only if we’re informed and discriminating.

The EU has been more proactive about clamping down on some of this behaviour. But the Internet is still largely an open highway. That’s a good thing but remember the hazards of the open road.
David

Backup Updated

February 17, 2018 at 4:53 pm | Posted in Backup, Computers, Software | Leave a comment

I’ve written several articles on computer backup over the years. For example:

Backup That Counts reviewed types and locations of backups

Backup That Works talks about why you want a backup, and why you want to choose the system carefully.

However, many of the programs I’ve recommended have not been upgraded for more recent Windows versions. It’s time for a new article.

For my work computer, I have 3 kinds of backup:
– weekly system image of the boot drive
– daily data backup of changed files – a differential with monthly full, 3 months kept.
backup on save (real time or file sync) of key files or folders from my current projects, with versions.

The first ensures I can recover my system and get up and running quickly. Standard backups don’t work well for restoring operating systems – you want imaging for that. The second ensures I have copies and quick access to everything I’ve worked on or collected. The third makes a copy each time I save the file, ensuring I lose little time if key files are corrupted, deleted in error, or similar. I can get working quickly even if the whole system died.

While I’ve not needed these backups often, they make a huge difference when I do. There are some files that could not be recovered.

While Windows 10 has a backup tool included, I don’t like the approach. It’s hard to check if you don’t know what it’s doing. Other tools I’ve used have become out-of-date or insufficient.

I found maintaining 3 different programs annoying so I ended up migrating to AOMEI Backupper to get the first 2 types of backup. This includes a tool to create a bootable disk so you can access your backup without the software installed, like in moving to a new system. Then after testing, I upgraded to the paid version to get the third, File Sync. The paid version also has some useful tools I wanted. AOMEI has served me well for awhile now.

I’ve not found other tools that combine these techniques. AOMEI isn’t perfect. It’s not always clear what some settings mean. But their web site covers the process for configuring most options. Most importantly, the software has been very reliable. Once it’s set up and scheduled, it’s simply worked.
David

Book Publishing – Part 2 of 2

August 28, 2017 at 11:35 pm | Posted in Books, Online services, Software, Writing | 8 Comments
Tags: , , , , , , , , ,

< see Part 1

File Conversion

You’ve now designed your book in a set of files. Your next step is customizing for print and ebook versions. Make a copy of your chapter files in a sub-folder each for print and ebook, without the Book file. For the ebook version, you can drop the Index and pre-title page as they’re irrelevant here. Then create a new Book file for each version. Now you can customize for the final output.

See the Guides links in the Distribution section below to compare requirements with what you’re doing. Distributors require a Contents file and a Cover file for each format that meets specifications. (PDF format for print)

Print Version
Review your files and adjust paragraph breaks to avoid subtitles at the bottom of pages and so forth. Ideally, you want page tops to be even. (you don’t want these customizations in the ebook version)

The files for your cover and your content will be exported into separate PDF’s with fonts.

The print version should ideally be CMYK images to avoid unexpected issues later. If you’ve been working in RGB, update your images to CMYK, copy them into the Print sub-folder and re-link them in the Links panel.

To export the cover, File/ PDF Presets/ Press quality. On Bleed page, select “use Doc bleeds” or it crops them off. On Output, check its set to CMYK (it should be).

To export the book, select all chapters in the Book panel, then Export as PDF, uncheck Spreads.

Check everything thoroughly. Fix and re-export as required.

For both, edit the PDF document properties after to add the title and author. Don’t apply any security. If you don’t have Adobe Acrobat (full version) to do this, you can use the free version of Tracker PDF-XChange Editor. (It’s PDF Reader is much faster than Acrobat Reader)

EBook Versions
Many of the dozen or so early ebook formats have faded out now. The most important are:
.ePub – the open standard format, for Nooks and generic readers but not Kindle.
.mobi – for Amazon Kindle (and the similar .azw)
.pdf – designed for fixed-format printing but almost every computer has a PDF reader.
(comics have their own .cbr and .cbz formats. Other formats.)

The first is what you need for digital book stores. The second for Amazon. The last is best for manually printing a copy, like for your test readers. You can also add security to a PDF but because the pages don’t flow to the device, it’s less flexible for screen reading.

The first two formats are actually a packaged website. The chapters are html files, just like web pages. This is why the text can reflow so easily on any device. Your styles are converted to style-sheets. It uses web tags for formatting and design. There’s a table of contents file, much like a navigation bar. And a file much like a site-map. All of this is wrapped inside the file container, be it on Kindle, Nook, iPad or tablet.

(You can take your Word files and ‘save as a web page’ and upload that. But Word is full of useless code and you’ve lost control over your layout. Better to get it right first and upload that.)

Images for ebooks should be RGB colour. This means a different version from Print.

From InDesign, in the Book panel you can select the chapters and Export the book to EPUB format directly. (PDF too) That file can then be converted to MOBI.

I’d recommend polishing and testing the EPUB before MOBI conversion as you can’t edit a MOBI file very easily. (Amazon gives instructions, but it’s not as straightforward)

Editing, tweaking, and converting your ebooks can be done with free software. If you have a little familiarity with web design, you’ll find the required fixes straightforward.

Calibre is the most popular editor for ebooks and includes a library & converter, a good reader and an edit program. The Manual. Converting requires adding the book to its library first (it makes a copy). When you convert, it will overwrite the previous converted version without warning. It also adds the cover once one is assigned, even if you don’t want it to.

(Alpha Ebooks Manager library software doesn’t copy, reorganize, or change your library, by comparison. But the free version is less useful.)

Sigil is similar to Calibre but has a single interface. I preferred it for editing and got the best results. But Calibre does have the good reader for checking, so I kept it installed.

The EPUB output from InDesign removed the second paragraph break from each paragraph, butting them together. As I didn’t use paragraph indentation, it made it harder to read, so I added them back in.

Ebooks do have their own TOC system but it’s normal to keep the table of contents pages anyway. As the page numbers are gone, you may need to remove the contents page links but you can relink to chapter files instead. You have to add page anchors to link to subsections.

Once you have the file polished, check it meets the EPUB standard. You can use the on-line epubcheck Validator. They also have a downloadable version but it requires Java. (I didn’t find the Sigil FlightCrew validator plugin as useful.)

There will be issues. This often requires tweaking the HTML code. For example, the conversion naturally broke the table of contents links, mentioned above. I also edited the Chapter names in the ebook TOC so they looked better. This is editing the label content, not the file names.

I also needed to add some meta information in the contents file. Use the Metadata Editor to add useful tags and enter your title, author, and so forth. For the ISBN, remember you must do a different version for the MOBI conversion as it has a different ISBN.

I also had to reposition many of the images.

Once it checks out and is polished, it’s time for the MOBI conversion. Amazon has a strong preference for their KindleGen software for converting EPUB to MOBI. This also adds “Enhanced Typesetting.” However, KindleGen is a command line tool. This gets annoying when you have to do a bunch of tests to fix issues. You can get software that adds a GUI, but I got the best results by using the KindleGen plugin in Sigil.

There is also an EPUB3 plugin that upconverts the EPUB2 you’ve been working with from InDesign. IngramSpark wants EPUB3.

Sigil has numerous other plugins too.

Testing
You’ll want to install a few software ereaders to test your files. And try them on any electronic readers you have (called side-loading). Some of the independent software doesn’t translate the formatting well, which is one reason I like the Calibre reader. It also handles a wide range of formats. Avoid software that takes over and reorganizes your library. It may even convert your ebooks to a proprietary format.

Amazon offers a Kindle Previewer which is your best bet for testing the MOBI files. It will let you know how it’s responding to the file and if it has Enhanced Typesetting. (Their Kindle app is distinct)

Finally, you’ll want a cropped image for the front cover, trimming off the bleed. JPG in RGB is the typical format. You’d also use this on your web site and promotional materials.

For detailed specs to check your files against the supplier requirements, see the Guides links in Publishing below.

Web Design

Your book also needs a web presence on-line so you can be contacted by readers, the press, tell people where to order, etc. If you have a website, it’s simply a matter of adding a page for the book. If the website is unrelated, you can get a domain that points just to the book page inside your site.

If you don’t have a site, you can use a free WordPress.com site (like this one) but can’t use it for commercial purposes. Just information and links, like an on-line brochure. Get a domain for the book too, like mybook.com.

If you want to use the site commercially to promote your book and use it as an information hub, then you’d want a hosted WordPress.org site. For that you need a domain and a WordPress hosting service. WordPress is modular so it massively simplifies designing and adding features to your site. Choose a theme and 90% of the design work is done. Choose a plugin to add features.

As an author, it can be very useful to take up blogging to build an audience for your work and a web presence. A blog is an included option in WordPress sites. You can post articles, announcements, events, gather subscribers, and so forth. Blogs also have a higher profile in search engines than static sites.

Keep in mind that having a Facebook Page or similar is social media, not a web site (see below). Only Facebook users have access or can interact with you there. For your main site, you want an open web platform where you control the content. If you’re active on social media, that doesn’t have to change. But you don’t want to limit access to your book info.

You can set up an estore on your website to sell directly via PayPal or an ecommerce platform. But it’s usually not worth the effort for a book or two as your store is largely invisible compared to something like Amazon. People will be less likely to share their credit card info with a small site too. And having a store means a whole other business, as mentioned in Publishing below. Let your distributors take care of this for you. Far more people will look for and see your book in the big stores than on a small site.

Publishing

You are the publisher as discussed in ISBN in Part 1. But you don’t want to be the distributor. You’ve been preparing files to upload to a distributor. They then act as your wholesale (bookstores, etc) and retail (Amazon, etc) sales channels.

You’re looking for a Print on Demand (POD) distributor so you don’t have to carry inventory to fulfill sales. Otherwise self-publishing is massively more expensive and a lot more work. Being your own distributor means buying lots of inventory from a printer, taking orders, processing sales, setting up a shipping system, shipping books, dealing with returns, handling delivery problems, and more. Let your distributor take care of all this and save your time and money.

Price (Update)
It’s worth doing a bit of research for comparables and costs before setting your price. If you’re going to offer your book to bookstores, the price has to cover both the cost of printing and the 55% bookstore discount. This is your wholesale price. If you don’t offer the standard discount, they are unlikely to carry it.

Example:
Book Type: 250 pages, 6 x 9, paperback
List Price: $20.00
Retail Discount: 55%
Net Price for retailer: (List Price x discount) = $11
Print fee = $5.50
Publisher Compensation = $3.50

For direct sales, it would be Price less Print fee plus the cost per book of Shipping the printed books to you. This is usually your best cut. Sales through a distributor like Amazon would be in between.

For ebooks, note the promotional programs. For example, Amazon KDP is currently pushing a 70% royalty on ebooks if you price it at $9.99 or less (compared to 35% for over that). Lower price, but higher take. As you usually want to offer the same price across all channels, this may influence your price everywhere. Ebooks are often about 60% of the price of print but the above example would make it 50%.

As I noted in ISBN in Part 1, if you’re planning to sell internationally, it’s best not to include the price in the cover barcode or text. Instead it’s set in the sales channel of the distributor (below).

Distribution

Ingram, a large, established book distributor, bought Lightning Source (POD). They now offer both print and ebook distribution to a huge market via IngramSpark. You’re included in their catalog used by bookstores and libraries.

Amazon owns CreateSpace for POD and offers the KDP program for Kindle ebooks. Amazon is a bit less expensive but Ingram handles wider distribution better. Ingram is preferable to Amazon’s “Expanded Distribution.” Ingram can handle distribution to Amazon too, but because Amazon is the world’s largest bookstore, it’s better to handle them directly.

Ingram, as with most printers, does charge a setup fee for checking and posting your uploaded files (which is refunded if you order 50 books after). Amazon is free. After uploading the files to each supplier, you’ll be able to view results on-line or in downloadable “proofs.” You’ll want to order a print “proof” and have it shipped quickly so you can address any issues prior to your release date. Check it carefully.

Update: Note that the uploading process is different for each company. Ingram has you complete all account and payment info before you can upload books (see their guide below). CreateSpace takes you into uploading much faster, but reminds you to complete account info afterwards. And so on.

You’ll need banking info for the payment sections. Direct deposit is ideal as you’ll get paid faster. The sales have to meet a threshold in each currency before they’ll mail a cheque.  Ingram pays after 90 days, Amazon after 30 but Ingram’s thresholds are lower. They both insist on paying in the currency of your country. As a Canadian, I couldn’t deposit to my US$ account, for example.

After you complete the process on Createspace, they do offer to send your files to KDP to add a Kindle version. However, I don’t recommend this approach as you have less control over the results. You already did the conversion and testing above. Ditto with adding a print version to KDP (see below).

If you’ve followed the instructions above, your book files should upload smoothly. But you can expect there to still be bugs. The KDP upload, for example, does an automatic spell check and may find surprises.

Amazon doesn’t charge for uploading new versions either but Ingram does. In either case, new files uploaded have to be re-screened, which can make them unavailable for a day or 2 if the changes are significant… so you do want to minimize the number of re-uploads.

Release Date (Update)
They recommend you allow a month or more between first uploading and your release date. This gives you time to test, fix, reupload, and retest. It also gets your files distributed to the various outlets for pre-sale prior to release.

However, Ingram and KDP allow you to set a release date but Createspace does not. It simply launches the book when you activate the sales channels. This means it shows up for sale in some channels in a day or 2, others a little later, and in Canada, nearly 30 days later. As a Canadian author wanting the print book available on Amazon.ca on the release date, this meant allowing it to be for sale in other markets for a few weeks prior. Clearly, this has been an issue for customers as they essentially apologized when I asked about it.

I find it odd they’ve not addressed this as it puts Createspace out of sync with Amazon sales outlets and KDP. But they each behave as quite distinct companies. If Amazon print is your primary channel, it means you have a rolling release date.

Guides
IngramSpark: Guide to Independent Publishing     File Creation Guide (pdf)

Amazon CreateSpace (print POD)
Particularly, you want the PDF submission spec

Amazon Kindle Direct (KDP) (ebooks)

KDP Print Publishing Guidelines (not recommended per below, but here’s the guide)

You’ll notice the many more rules Amazon has due to people trying to game their system. KDP offers tools for doing work on their site but it’s better to use professional tools and test first before uploading. They give you an option to fix your MOBI ebooks though.

You can order prints through KDP but you get fewer options. You can’t order physical proofs or your own copies or (proofs and author copies now available early 2018) drop ship batches to others. But you can set a release date for print books. Here’s a comparison with CreateSpace.

Smashwords is a popular ebook only distributor, but I found IngramSpark covers more bases.

Because of the cost of shipping books, you may also find it valuable to upload to a more local POD or short-run printer, depending on where you’re based. This is not for distribution but simply for your own print orders. You’ll need hard copies to sell at your book launch, to send review copies and gifts, and so forth. Even with setup costs, the savings in shipping and speed can be substantial. It’s worth getting a quote.

Marketing

Marketing is often anathema for writers. Partly because many authors are introverts but also because it’s a very different skill set. Here’s a site on Marketing for Introverts. And Change The World Marketing, oriented to ethical approaches.

If you know any experts or well-known authors, it’s helpful to have reviews or testimonials for marketing. Maybe they’ll even write your foreword. Asking if they’ll read a pre-published version (after primary editing) helps you get them in advance, perhaps for your books back cover or launch publicity.

Also, be sure to set up an Author page on Amazon. This is a separate step from the above. Head to Author Central to register. Five of the Amazon sites have their own Author Page setup but just US and UK have English buttons and links. Do what you can. They’ll send you links.

On Reviews
Do not respond to on-line customer reviews. These are not like blog or social comments. You can get attacked for this and get swarmed with low reviews. There are also some on-line reader communities you have to be very careful about entering as an author.

Don’t pay for reviews. They’ll get deleted along with anyone Amazon discovers you have a social media connection with.

You can certainly send review copies though. For example, Midwest Book Review. You send them 2 books which they review and resell to support the business. They’re long established.

When you get such reviews, don’t add them as a customer review. These are Editorial reviews. On Amazon, you add them through Author Central (above) or put them in the product description.

Social Media
Having a social media presence is a good idea. This will raise your presence in other communities on-line. Pick a couple of popular platforms. But don’t use them for direct marketing. Social media is just that, for social sharing. Think of it like updating friends, not sending ads. If you’re blogging, an update about your book is fine, but spamming subscribers with advertising can cause a backlash.

Remember that some social media, like Facebook or Pinterest, is a partially closed system. Posting there is for that community, not the web as a whole. Non-users will have limited to no access and cannot interact with you. This is why your open-access website should be the center of your marketing efforts. It should contain direct links to purchase your book, typically through other sites like Amazon. By all means, post updates on Facebook and the like. But you’ll gain the most eyes by posting to your website (blogging) and setting that up to feed other social media automatically. This will tend to attract more people to your website mailing list too.

Your writers group should be able to help you with local book launch and promotion events. Local papers are often good about publishing book launch events from a press release.

Congratulations! Publishing a book is still a remarkable accomplishment.

Do you have any other suggestions that worked for you?
David

Book Publishing – Part 1 of 2

August 28, 2017 at 11:04 pm | Posted in Backup, Books, Design, Online services, Software, Writing | 7 Comments
Tags: , , , , , ,

Many people have thought about writing a book. A small percent of those ever start. An even smaller percent get it written and a still smaller group try to get it published.

Nowadays, the majority of books are self-published. The average book sells fewer than 100 copies. Most published authors also have ideas that never see the page, half-finished works, and works that never went to publication.

Clearly, writing a book requires determination and passion. Self-publishing adds quite a few other hurdles to the equation. Writing turns out to be just the first step. Getting it out there requires many more steps. You can pay to get professional help for almost all of it (called a vanity press) but is that cost-effective for the market you have?

Some steps require help. But many steps can accomplished with a little learning and free or low-cost resources.

I’ve recently been through this process myself. I’ve attended several publishing workshops and writers groups, heard many presentations by people in the industry, and have been researching the software and documenting my process. Other authors have found the tips valuable, so I thought it would be useful to share some of what I’ve learned.

The first thing to understand is that desktop publishing revolutionized book publishing too. The changes are still coming. How-to-publish books from two years ago are no longer current. You can sell your self-published book internationally through dozens of outlets and even get into the catalogs of traditional distributors for libraries and bookstores.

But to get any real uptake requires you create a professional product. While it’s possible to draft a book in Word, upload that into Amazon as an ebook and offer it to the world, the likelihood of that going anywhere is tiny. That’s like putting a lemonade stand on the street and expecting the money to roll in. You’re competing with thousands of others around the world.

Further, if your audience happens to find your book but cringes at the cover or opening pages, that’ll kill sales, lose you money on bookstore returns, and get bad reviews. Unprofessional work lowers the whole market.

Following is a list of some of the stages of a book project. Each requires different skills and often, different tools. Below, I’ll go into each section and suggest tools and tips that may work for you. This article assumes you’ll be producing print and ebook versions of your book to reach the largest number of international readers. Ebooks alone are easier to prepare but you can’t use that for print. You can down-sample your print design into an ebook though. We’ll design for print, then output print and digital editions.

Note that this is an overview. Many of these topics have entire professions and websites dedicated to them. I’ve added numerous links to more information. The software I suggest is Windows-based, although some of it is available for other platforms.

Support
Writing
Layout
Editing
ISBN
Interior Design
Cover Design

Part 2:
File Conversion
Troubleshooting
Web Design
Publishing
Distribution
Marketing

Support

This is a professional project so you need an appropriate place to write, a decent chair, uninterrupted time, and so on.

You’ll want to set up a folder structure on your computer to store your book files in. Just like a filing cabinet. It can be a folder on your desktop but you want to take special care of these files as they’ll contain many hours of work.

If you haven’t already, you also want a backup system. I’ve seen authors loose their entire book in one hiccup. Have an automated backup. Make copies of different versions if you make major changes, like prior to editing. The ideal for creatives is a backup-on-save tool like File Hamster (free after the trial but needs .Net2) or Aomei Backupper Pro. The later has Real-time Sync in the paid version, along with system and data backup tools from the free version.

Its also a solo profession so you’ll find connecting with other writers and sharing tips valuable. Most areas have local writers groups. Just beware of groups where no one is producing work.

There are also on-line groups and sites you may find valuable. Just remember this is networking time, not work.

Finally, if you’re putting in a lot of hours, here’s a site of wellness tips for writers.

Writing

Your primary tool for writing is typically a word processor. Many people just use what they have but there are excellent free alternatives that will work with standard formats, including OpenOffice and LibreOffice. LibreOffice is a branch of OpenOffice that has been further along in development. The interface looks much like Word before the ribbon – many prefer that. Both support open standards.

You also have other choices. Inexpensive tools like Scrivener support the overall writing process. Others use clipping tools like Evernote to gather material. Recent versions of Windows include OneNote or it can be installed free. I paste notes into searchable text files

I’ve been writing on-line for a long time so I migrated to using Notepad++. It’s a text editor with spell check. It keeps me focused on the writing and doesn’t add unnecessary code. I’ve used it for long-form writing as well, migrating to LibreOffice when it’s time for formatting and sharing with the editor.

It’s usually best to stay with the flow of writing and leave the editing for later. Get the ideas down, then organize them. Avoid the temptation to format too soon. Lots more polishing is needed before you make it look pretty.

Once you get the content on the page and into some kind of structure, then you can go back over the words and begin smoothing.

Most authors benefit from a little planning, like an outline and structure so they can organize rough chapters and place the content. You may find a writing workshop valuable, perhaps one for your genre. Be forewarned that many publishing workshops are designed as sales fronts for vanity presses. They can still be valuable but only if it isn’t all about their sales channel – if they actually help you structure your book.

Ever notice how Google often finds the same articles on multiple blogs without credit? When you’re charging for a book, you copy at your peril. Plagiarism is easy to check. In fact, some editing tools include plagiarism checkers so you can insure you’re not wording things too much like another source.

Quoting is fine but give valid credit and use valid sources. There are a lot of badly attributed quotes out there, especially for people like Mandela and Einstein. If it doesn’t say where they said it, it’s not a valid source as it can’t be verified. Sites like WikiQuotes can help ensure you’re using legitimate ones.

Layout

Once you have a rough draft, you need to formalize the book structure more. Chapters, subsections, footnotes and so forth. Also roughly placing images and tables.

Here’s an article that talks about the front and back parts to plan, especially for non-fiction books.

If you’re not using a word-processor, it’s time to migrate your copy there. Just roughed in layout though – like bolding titles. Detailed formatting and design will be done in other tools after a lot more editing.

Editing

This is the step that requires professional help. It’s the step that will give your book a professional polish and readability. Even professional editors will hire another editor for their own writing.

However, before you head to an editor, you can save a great deal by first using one of the better editing tools like ProWritingAid. Then you’re not paying someone to fix your basic typos and glitches. ProWritingAid has a free on-line tool you can try but for a book-sized project, you’ll want more. They have several options including a Word plugin and a stand-along program. To give you a sense of how thorough it is, the tool has 25 reports. As you get to know it, you’ll find your writing has typical weaknesses best addressed with certain reports. For example, if you’re prone to over-use words or use clichés, use those reports. But if not, you might skip them.

One author wrote that she uses EditMinion, a free online tool, first. Then she uses ProWritingAid.

With that level of polish, you’re ready for a professional editor. Hopefully what you need is line and copy editing and not a rewrite. (there are many types of editing)

Your best source for an editor can be other authors recommendations. I’ve seen people without even an English degree let alone experience put up an editor shingle as a work-at-home project. Don’t shortcut. You can also solicit bids from sites like Reedsy.

Typically, you’ll send a sample and they’ll let you know how much work it needs. Then you’ll have an estimate of cost and time. The editors I’ve worked with requested Word docs, turned on Edit/ Track Changes, and marked up the files. You can then accept or reject their recommendations. Much easier than retyping although some of that will be called for too.

Be prepared for lots of changes. The object here is clear communication, not saving your little gems. A good editor fixes issues with clarity, grammar, and flow. They don’t change your voice or influence your story (unless it needs a reworking). If they do, look elsewhere. This is your book, not theirs.

If you’re making use of real-world or historical facts, this is a good time to verify your sources.

If you’re writing non-fiction, you also want to be building a Bibliography and references. Here’s an easy, free on-line citation generator for your Bibliography. (choose the style you want: Chicago, APA, etc) Just copy and paste them in alphabetically.

Once the whole thing is put together, it’s useful to have a few readers go over the text to make sure everything is clear to them. You want to be sure readers don’t get lost or stuck somewhere.

Then you run the entirety through a final proofreading aka a re-edit. Resist the urge to tweak the text after this stage as you can add new errors. Consider the content done.

ISBN

Every published book and every format of that book (soft cover, hard cover, epub, kindle, pdf, etc.) requires its own ISBN number. It will be on your printed back cover, your Copyright page, and on the book sales web page.

While you can pay for ISBN’s when uploading through Amazon and other distributors, that will tie your book to them as the “publisher.” You may have to get a new ISBN for other outlets. This will split up your sales data and lower your books presence and thus sales.

A similar thing will happen if your book is later picked up by a publisher but in that case, you’d only migrate to the lower take of a publishing deal if there are expectations of higher sales. As a publisher would normally re-edit and design a new cover, it would be a new edition, anyway.

Your better bet in self-publishing is to create an “imprint.” Essentially you make up the name of a publishing entity that represents your books and ties into your “brand.” Then you order your own ISBN numbers under this. This becomes your “publishing company.” (some charge for this tidbit) Mine, for example, is Davidya Publishing. If there’s tax advantages, you can formalize the company later. In the US, the government farmed out the sale of ISBN’s through Bowker. In Canada, you can get ISBN’s from the government for free. For other countries just search “ISBN CountryName.” Each varies.

With your ISBN, you’re ready to design your book. You can start the book design before getting your ISBN but you’ll need it for the print cover.

Interior Design

Your first decision before you begin design is to choose a book size. Unless you have a great reason, I’d strongly recommend a standard size.

Most recommend you get a book designer to design your book professionally. Interior Design is the look of the inside of your book – the fonts, headings, icons, page numbering, spacing, gutter, and so forth. This may seem simple but a poorly designed book is harder to read and will turn people off. Your book is not a school essay but a product you’ll be offering for sale. Does it look like it’s a commercial product?

You can ask other authors for recommendations or get bids for a book designer at 99designs.

If you have design skills and you’re going to tackle your own design, take a look at how others have designed their books, especially in your genre. Even if you do plan to hire a pro, you may find reading this over will help you understand what you’ll need from them.

Several experienced authors strongly recommended Adobe InDesign, saying it was worth the cost and learning curve long term. I’m happy I took their advice. You don’t need the latest version but your printers are set up to work with InDesign output. Consider the cost relative to a designer over several books. You’ll also be using it for the Cover design, if you’re tackling that too. It has a learning curve, but that’s easier if you’ve used other Adobe products like PhotoShop or InDesign’s predecessor PageMaker. And there’s lots of on-line help.

A free alternative that runs on many platforms is Scribus. I understand there can be some problems with uploading its output to printers but that these can be fixed in Acrobat. But if you need Acrobat, why not just get InDesign?

In InDesign, create a file for each section and chapter (don’t skip this), copy the content from your polished work into the files, then assemble the files as a Book. For chapter file names, start them with numbers to help organize them and avoid spaces in the file names – this will cause a hassle later in ebook world.

Also recognize that a bound book has specific layout requirements. You want to start right.

Choose your fonts. Make sure you can use the fonts commercially. Some downloaded fonts don’t authorize commercial use, for example.

Remember your basic design principles:
– fonts and other design elements should be the same or different, not similar. Similar looks like a mistake.
– traditionally, body text is serif fonts while titles are sans serif.
– make sure the cover is legible. It won’t help you if the title is hard to read or can be misread.
– paragraphs can be indented or not. You don’t need double spaces after a period. (these are old typewriter rules)

Set up pagination. File/ Document Setup to adjust. Usually all chapters will be an even number of pages to ensure new chapters start on the right side.

Design one of the early chapters first as a design template, adding the styles for titles, sub-sections, quotes, paragraphs, footnotes, etc.. Then set this file as the default Style Source (left side of the Book list) and copy the styles out to the other chapters. You may also want to edit the default paragraph in InDesign, or replace it in each file. Then you just go through your text and apply the styles.

Images should be at least 300 dpi so they print clearly. Only use images you have the rights to and give credit in the book. Again, you’re selling the product so using others work without rights is theft. You don’t want your distributor to delete your book due to a complaint.

Here’s a few articles that go over setting up your book in InDesign. Once you get the basics working, it comes together quickly.

One weakness of InDesign is it does footnotes but not endnotes. If you want endnotes, set footnotes then convert them to end-of-chapter notes or end-of-book notes. I used these scripts. You can rerun scripts to update changes but it’s easiest to do this once when the content is stable.

You’re also adding the opening and closing sections like the title and copyright page, dedication, index and so on. (see link in Layout above) InDesign has a tool for creating an Index from words you mark. (see the Index panel) It will also create a Table of Contents (TOC) from the titles and sub-sections you’ve styled. You can also use the table of contents tool to create a list of illustrations or tables in a similar way. Style the related text appropriately and distinctly, then use that to structure your TOC.

You had to polish every bit of text over and over. Now you have to polish every bit of the design over and over. Random things that happened during writing and editing can create little layout bugs. Like having two line breaks instead of one hard return can create different spacing. There will be things that are hard to find in InDesign. A quick search on-line usually finds the solution.

When you output the ebook version later, it will strip some of this formatting for you, like page numbers. They’re of no use when the text reflows to the device screen size. But you must be fussy about this step for the print version.

For the final print version, you’ll want to be adding some custom spacing to ensure subtitles are not at the bottom of pages and so forth. But leave these edits out for now as you don’t want to mess up your ebook version.

Cover Design

This is the #2 place where professional help is most recommended. Your cover design will determine if someone even looks at your book. If it screams amateur, they’ll assume the content is too. (Yes, people judge a book by its cover.)

Sure, you can auto-generate a cover in Calibre (in Part 2) using your ebooks metadata but it looks the part. You can also create a cover in CreateSpace for Amazon. But again, generic parts make for a generic look.

As above, you can use 99Designs to find a cover designer or talk with fellow authors for recommendations. Some designers will do both interior and cover at a slightly reduced rate. If you’re doing an ebook as well, you’ll also want the digital front cover. 99Designs also has a deal for IngramSpark customers.

If you happen to have graphic design skills, you can study how professional book covers are designed in your genre, then use design software of your choice. But note that the output of that software is what you’ll be uploading to the printers. They’ll reject files that don’t meet professional standards. They don’t accept JPGs for print, for example. Again, InDesign is recommended.

Remember that the cover will be printed so the colours have to be in the CMYK gamut or your cover can look quite different printed than you expected.

Again, use at least 300 dpi images and only use images you have the rights to and give credit in the book.

In the distribution section, I’ll be recommending you upload directly to Amazon as it’s the largest bookstore in the world. And I’ll recommend you upload to Ingram to get in their catalog plus get distribution through the worlds other ebook stores. This covers most everyone else including libraries and bookstores.

To build your cover correctly, you need a template set to the right size – both the cover size and the spine. The spine is determined by the number of pages. Your print book cover will be printed as a “spread” of the front, spine and back so everything has to be exactly the right size.

You also have to build the cover with “bleed.” This means having extra image around all the edges so the cutting of the cover doesn’t leave any unprinted trim. Usually .125″ on all sides but your printer may vary this.

While there are formulas for calculating all this, it’s easier to download templates from the suppliers. Ingrams will include your ISBN barcode too. If you plan to sell your print book internationally, I’d recommend not including the price in the barcode. It will be set in the particular sales channel.

Again, the print cover will be CMYK and the ebook cover is RGB. But it’s easier to stick with one version until you get to the conversion stage.

Getting an IngramSpark template

CreateSpace (Amazon) template

This completes the Design phase of your books production.

In Part 2 on ForNow, we’ll convert the book to the final formats and prepare the book for uploading and distribution.

David

What3Words Global Addressing

May 14, 2017 at 10:11 pm | Posted in Internet, Online services, Software, Technology, Web Apps | Leave a comment
Tags: , ,

You may be familiar with the domain name system for the Internet. By using domain name servers, the human-friendly domain name is converted into the actual numerical IP address of the web server. For example, you can type Google.com into your browser and it will look up the real address of the server, then load the site. This is much easier than remembering something like 216.58.194.78. And this is even more true of the coming IPv6 that will have much longer numbers.

This issue is greater still for mapping the world. Street addressing is somewhat random and in older cities like London or Tokyo, is rather a maze. And what of meeting someone in a large space like a stadium parking lot or a busy monument? And what about all the places that don’t have an address, like a park or forest?

The US Air Force developed the space-based Navstar Global Positioning System (now just called GPS) in 1973. It was fully rolled out by 1995 but only low level resolution was available to the public then. It has been progressively upgraded since and other overlapping systems have been added by other governments. With a GPS receiver, we can locate ourselves quite specifically on the earth. Most modern cell phones include one.

But once again, we have the same issue as with a server IP address. How human-friendly is a latitude & longitude like 49.303371, -123.136826? What about telling someone to meet you at marching.commented.priced instead?

Huh?

This is where What3Words (w3w) comes in. This is a tool that converts the GPS of a 3 sq meter (about 9′ square) space into 3 random words. 57 trillion human-relatable spaces on the globe and each can be addressed with 3 simple dictionary words. The words are randomized to avoid confusing similar words nearby. Thus, unlike street addresses or postal codes that are usually sequential, w3w is not.

Youtube

Where are you now? You can do a search, then drag the map to place the pointer at your exact location. Simple.

You can search by street address or by w3w address. If searching by street address, be careful with mapping accuracy. Google Maps addressing isn’t perfect. I’ve reported errors to them a few times.

In the free smartphone w3w app, Compass will tell you where you are. Its accuracy depends on if you have GPS turned on in your phone. With it off, my cell phone had a 21m radius of accuracy. Surprisingly close but not precise. With GPS on, it dropped to 7-12m – a big improvement but not the 3m accuracy of the grid. To give an exact address, you can drag the marker to the precise location first. And that depends on the quality of the map – w3w does offer several map options.

The key is giving an accurate reference point to the recipient, then it’s easy for them to find it.

There is no intuitive way of cross-checking accuracy if the map is vague or your GPS is imprecise. Also, the location entirely depends on their system as there is no real-world reference points for w3w, like an address on a building. But I can certainly see the advantages for sharing a point when there isn’t good street address references. Or you want someone to come to a side or back door. The above ‘marching.commented.priced‘ example is on a trail in a large park in western Canada. Want to go to Beaver Lake?

As the technology in use gets more refined, this will automatically become more precise.

w3w is an interesting idea that is evidently being used by transport and delivery companies in parts of the world where addressing has been an issue. If you have trouble getting people to the right place, it may be useful for you too.
David

Syncing Thunderbird to Android with MyPhoneExplorer

September 28, 2016 at 8:03 pm | Posted in Computers, Internet, Software, Technology | 14 Comments
Tags: , ,

Perhaps you’re a little old school like me – you prefer to use an email client like Thunderbird to manage your mail, contacts and schedule rather than using web tools. While webmail is great for traveling, it has serious limitations if you’re managing several email accounts and a lot of traffic.

You may also not be a fan of sharing your entire life with web tools that browse your information for marketing hooks. Yet it would be nice to have your Contacts and Calendar synced with your Android phone. While Google and similar tools make doing that easy, it’s always under their watchful eye.

The solution is to sync your computer and phone directly. Recently I ran into a nifty little tool called MyPhoneExplorer. Originally developed for Ericsson phones, they added Android support.

It allows syncing your address books with your phones, includes a Calendar view for various desktop calendars, and allows browsing your text messages, call logs, file system and various other more geeky things. It also allows syncing to multiple phones. (feature summary)

The focus of this article is syncing Windows Thunderbird Contacts and Lightning Calendar with your Android phone Contacts and Calendar.

You can connect with your phone via USB, WiFi or Bluetooth.
My Desktop doesn’t have bluetooth.

I routinely connect my G4 via USB to download pictures. However, this requires 2 extra things:
– An ABD driver but these have signing issues with recent versions of Windows.
– turn on Developer Options in Android. This is now somewhat hidden. For example, on the G4, it’s Settings, General, About Phone, Software info. Tap Build Number 5-6 times (it offers a countdown). This turns on Developer Options in the General Menu. Theres a switch to turn it off again inside the above. The FJSoft forum has links for other phones, drivers, etc.

Thus, in my case, the easy choice was Wireless.

I didn’t find detailed instructions for this Setup so I thought it worth going over what I did here.

Best to back up your phones contacts and Thunderbird before you do this, in case anything goes awry.

1) Download and install MyPhoneExplorer for your PC.
(There’s a portable option during setup but this doesn’t have the desired sync abilities)

2) In Play Store, install MyPhoneExplorer Client on your phone. The maker mentions it may install with first use of the desktop software, but I’d recommend this approach.

3) In Thunderbird, install the MyPhoneExplorer extension in Tools, Add-ons. You’ll find it in the Program directory of #1 above. (called “mpe-addin.xpi”) It has one setting, if you use Event Categories.

4) On Android, connect to WiFi (with the same router and subnet as your PC)

5) Start the client app on Android. Add a wifi pin # when prompted.
review Settings for syncing (turn off Google sync, for example)

6) Start the desktop app on you PC. Enter the PIN when prompted (it asked once). Review File, Settings. Autodetect worked fine for me.

Review Settings, esp in Sync:
Contacts:
For Contacts, set to Thunderbird, then click Advanced. Select the Address Books you want synced. For example, you may NOT want Collected Addresses on your phone.
The => symbol marks the default Address Book where new Phone Contacts will be added to Thunderbird. You may want a new address book for that purpose.

The program automatically loaded some Contacts from Thunderbird right away but not always what I wanted. Thus I set it to Sync Thunderbird > Phone only at first. After setting which address books and resyncing, it cleaned up the ones I didn’t want. Before it syncs, review the changes being made. Don’t let it delete phone contacts you want, etc. Select the contact to see the 2 options.

After it synced the right Address Books, I changed it back to sync both ways. I found there was a little cleaning up to do. A few of my Thunderbird Contacts didn’t have First & Last Names, for example, so didn’t display right on the phone. And I use Groups in Android Contacts. Not all of those where set per the Thunderbird Address books. Finally, Android has a Main phone number setting not used by Thunderbird, so that doesn’t sync. Change those to Work or whatever and all will be well. After a little back and forth and resyncing, I had them matching and synced.

Calendar:
Again, set Thunderbird and click Advanced. You can sync Events and/or Tasks. Again as a test, I synced to phone only at first, then both ways.

Tune the sync range. You probably don’t need years of events on your phone. Time Period allows you to control it. You can also set if private events are synced.

Thereafter, Connect & Disconnect the phone using F1 on the Desktop
Then select Contacts or Calendar and click the Sync button. Review the changes and OK.

Now you have your Contacts matching and have your Calendar with you.

You’ll find the best results by entering most data in Thunderbird and syncing. Android apps are simplified, so will do things like put the entire street address on one line. But it’s still handy to save new phone numbers and sync those with the desktop.
David

Windows 10 Upgrade & Tweaks

May 13, 2016 at 9:02 pm | Posted in Computers, Internet, Software | 14 Comments
Tags: , , , ,

If you’re using Windows 8, the free upgrade to Windows 10 is an obvious choice. Some describe it as what Win8 should have been in the first place. Windows 7 is a bigger jump but unless your hardware isn’t up for it, upgrading while it’s free may be a good idea. I waited for the dust to settle and the bugs to be fixed. But now, the end of the free upgrade period is coming July 29. Experts say it’s unlikely to be extended. If you’re considering it, it’s time to make your move and avoid a last-minute crunch.

If you’ve already upgraded, you may find the Protection section and below worth reviewing.

Usually, I install a fresh version of a new operating system so I’m starting from a clean slate without historical problems. But this requires reinstalling all the software and making all the settings changes from scratch. Because Win10 is a smaller change and my Win8 installs are newer, I opted for the free upgrade.

Preparation
You first want to update Windows fully.

And update your major software to ensure it’s current & compatible with Win10. You may find PSI useful. I had a problem with several things hanging after the upgrade. Turns out I needed to install a new version of my Antivirus tool. I had thought it’s version was current but it turned out not to be.

Next create a full image of your operating system – the update gives you the choice to revert but if something goes wrong, you want to be able to get back to where you started. I had trouble with Windows backup on my tablet. It wouldn’t accept any of the media options that where available. Macrium Reflect (free) allowed me to choose a large thumb drive and get the job done.

For Windows upgrade, you can download the tool to start the upgrade process here. This is preferable to using the “Get Windows 10” tool Microsoft has pushed on many computers.

If you’d like a fresh install, you can get the media creation tool here. It has DVD and thumb-drive options. But you’ll need a prior Win10 activation. To get that, you first have to Upgrade to Win10, then Activate, and then you can wipe the drive and install fresh. When you come to activate that, Microsoft will recognize a valid install on the same system. Fred Langa goes into details here. (paid content)

Installation
The install software first spends time checking your system and downloading the upgrade files. This can be done while you continue to work. When the time comes for the actual upgrade, a lunch break would be optimum.

I upgraded a hybrid tablet and a custom desktop system. Both went smoothly and retained most of my customization and settings.

As the install is completing, it will ask you to log in to your Microsoft account. If you had been using a PIN or similar, be sure to have your original password ready.

Next you get the “Get Going Fast” screen – don’t. Click the tiny Customize link in the lower left and review some of the default settings. If you want some privacy, you’ll want to turn a lot of the initial settings off. Also the default apps if you already have programs you prefer.

After more processing, it will bring you to the desktop. Most of it should look about the same.

If you were using a third-party start menu, it will probably have been turned off. Microsoft told me twice Classic Shell had been “removed” but it wasn’t uninstalled, just tuned off.

Protection
For some reason, System Protection is turned off by default. In Control Panel, System, System Protection, turn on System Protection for your boot drive, set the space at about 2% and create a Restore point. Details. This gives you the ability to roll back if an update causes trouble. Windows Updates are now only automatic so this is important.

Windows key-X will give you a quick menu to access various admin functions, including Control Panel. Or right-click the Start menu icon.

Adjustments
Three areas that need attention are the new variation of the Start menu, Search, and Settings. We’ll look at Settings first.

Continuing in the trend of Win8, Windows 10 has settings in 2 places – Control Panel and the Settings app. The second is accessed by the Gear icon in the Start menu. You’ll want to review each area as some of the default settings are less than desirable.

If you travel a lot and want to share settings across devices, want to use mostly MS products, and want to share everything with Microsoft and the world, you may be happy with the default settings. If not, spend a bit of time reviewing them. This will also give you a better sense of what Win10 offers and what you can control.

System
Most in here are fine. You may want to review Notifications.
Offline Maps may be useful for you if you need map access where Internet service is lacking. But the maps are large files. If they don’t finish downloading before you reboot, you have to start again.

Devices
By default, it has Windows manage your default printer, based on the one you used last. I turned that off. My printer was off during the update and was not on the list. When I turned it on and asked it to search for new printers, it said there was none but added the printer meantime.

Network
It’s notable Windows now tracks your data usage like a cell phone.
If you have wireless, in WiFi, Manage WiFi settings, turn off the automated connection options. You want to manage what hotspots you connect to, not your Contacts, etc. And why would you want where you connect being shared like this?

Personalization
I found that Windows retained my prior settings but the accent colour didn’t look as good.
You may want to tweak the Local Screen settings.
Start is where you adjust the Start menu. If you use default Windows locations for your music and such, you can control which folders are displayed.

Accounts
If you don’t plan to sync settings on multiple devices, turn off Sync. Key to understand here is it’s all synced through your Microsoft account on-line. That’s not exactly privacy.

You will need to keep your MS account but can add and use a Local account so you’re not obliged to sign in to Microsoft (and be connected to the Internet) whenever you’re using your computer. Of course, the later is required for some features.

To create a Local account, go to Family and Other Users: look for ‘I don’t have this persons sign-in’ and add a User without a MS account.

For security, it’s not recommended you do regular computing in an Admin account. One way to avoid loosing your personalizations is to create a new Admin user, then log into it and change the original account to Regular. You’ll need the Admin password to make changes but it prevents malware from running accidentally.

It was also recommended to create a 2nd Admin account as backup, in case the first gets corrupted.

Time and Ease
Worth browsing to see what’s here.

Privacy
This is the big one. Your Advertising ID? There are a series of sections to go over, including which apps can access your personal data. If you don’t use the App, you can turn it off.

Update
Updates are always automatic in Windows 10 Home. In Windows Update, Advanced options, change the setting to Notify. Otherwise it may reboot your computer to update while you’re working.

Some have suggested you can control updates by setting your connection to Metered. But that’s canceled whenever you connect to a new network.

Search
Click Cortana in the Taskbar (by the Start menu), then the Settings icon and turn off online. Otherwise, everything you search for on your computer is also searched on Bing and tracked. Don’t know about you, but I don’t expect to find my work files on the Internet. I also find it more useful to use a browser to search on-line. I can also then use the search engine of my choice. You may want to turn off Cortana reminders at the top too.

You can also change the space it takes – an icon may be fine. For that, right-click the Taskbar, select Search, and then box, icon, or hidden.

Start Menu
As usual, there’s some junk in the Start menu to unpin. I prefer desktop programs over almost any of the apps. Once you clean out the “Get Office” etc, the right side is more manageable. You may also find you can make the tiles smaller. If you’re not on a touchscreen, the big tiles just take up space.

I find the lack of a Programs folder view annoying. The All Apps alphabetical view is much less useful as I group related programs in folders. But I was happy to see you can right click and Uninstall the undesirables.

At first I found some weird things on the list, like program Help links rather than just executables. But that seems to have sorted itself out. However, if you open folders, it shows everything in all the sub-folders together, including files like “legal” & “readme”. It doesn’t show which program they’re associated with. They apparently assumed no one organizes their Start Menu.

You can browse the alpha list and Pin your more commonly used programs, or create a folder with shortcuts for them and make that a new Toolbar (from the Taskbar). Woody shares many other tricks here.

I’ll have to decide how I will organize the Start menu – break programs out of groups? That will make the list vastly longer and require I remember the right name (Office? Microsoft Office?). Or use a third-party Start menu? The free Classic Shell still works for Windows 10 and is great for hierarchical menus. The exploration continues.
David

Music Sequencing

April 16, 2016 at 2:44 pm | Posted in Computers, Hardware, History, Music, Software | 1 Comment
Tags: ,

If you’re not a musician, you may be unaware of one trend in modern music –  sequencing.

Many years ago, sequencing software first arose in tools like Cakewalk. You added a track for each instrument and placed “notes” that used MIDI data. MIDI is a digital language for music data that allowed various devices, instruments and computers to talk. It could produce synthetic notes from pre-defined instruments. Computer sound cards of the day added MIDI instruments to their repertoire.

Old Cakewalk
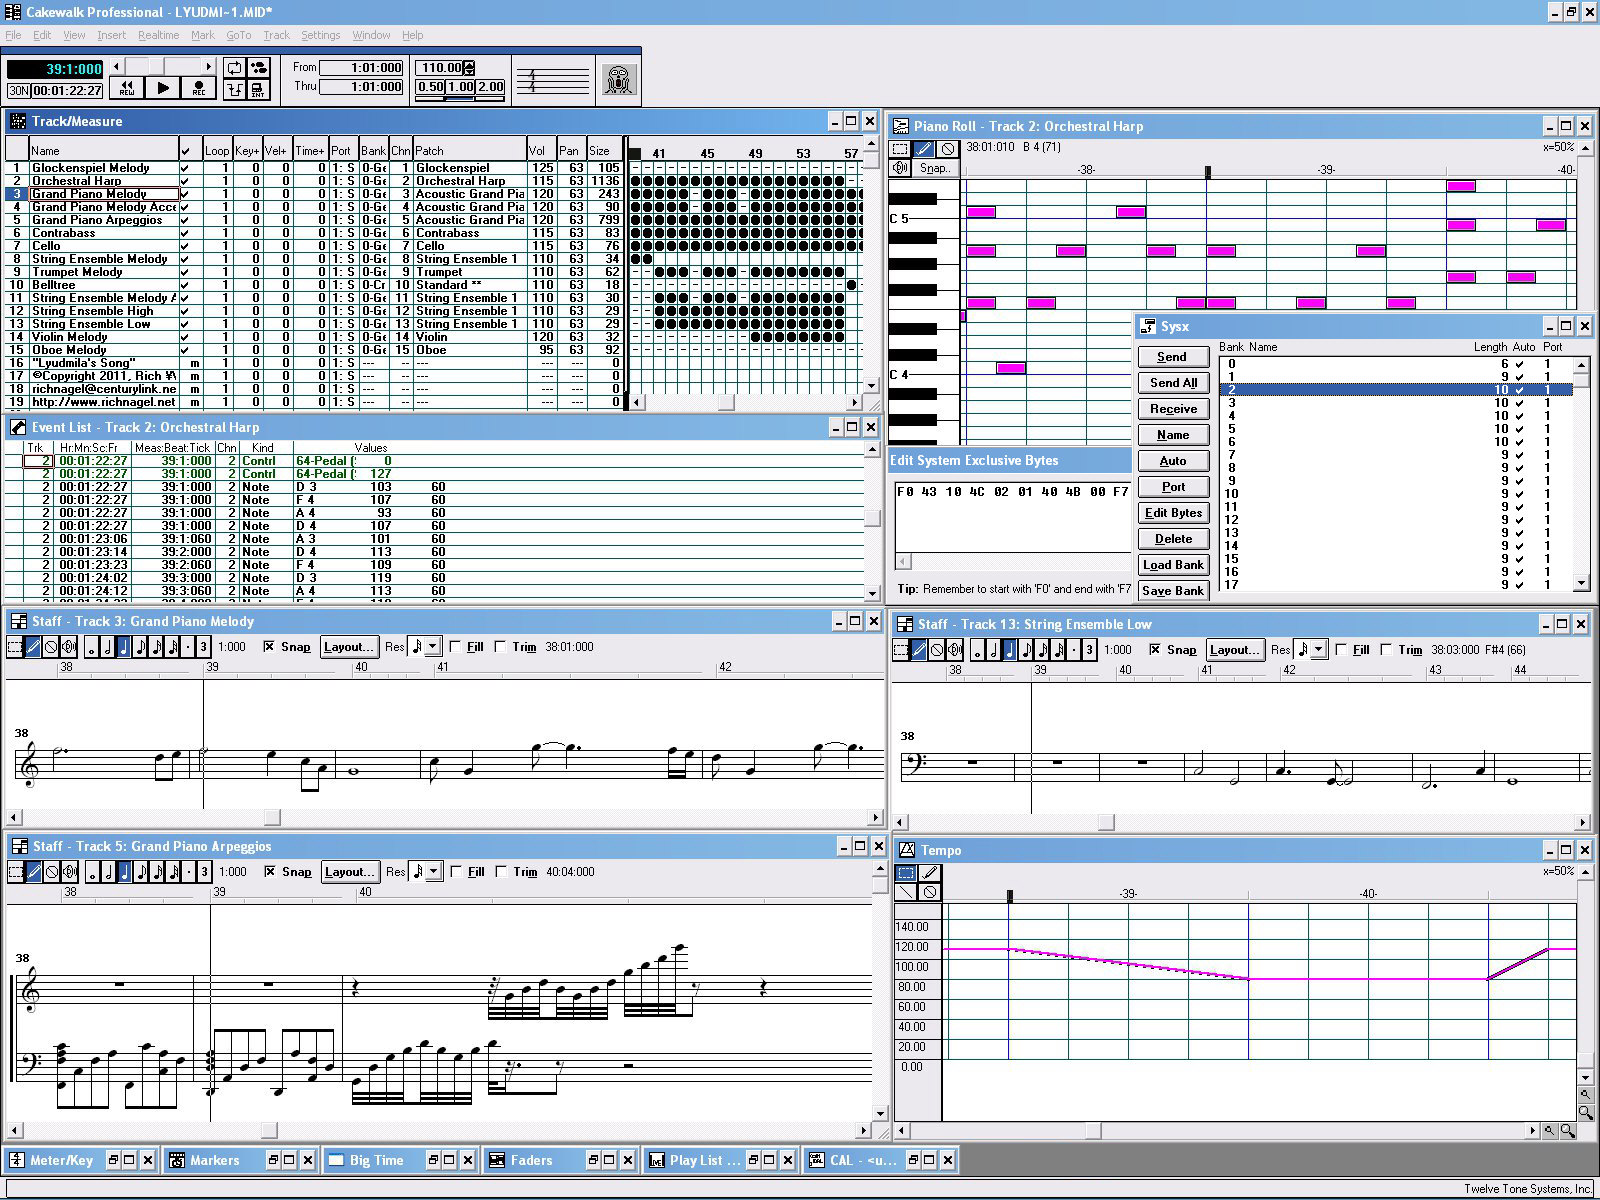
(the software looks complex but is mainly a series of modules. Tracks, sequencing, notation, mixer, etc.)

You could compose complex songs in such software, or just use it for background tracks like drums and bass.

Over time, the ability to add pre-recorded sample sounds of live instruments was added, greatly expanding the quality and flexibility.

You sometimes hear sequencing software used in live performances to duplicate studio techniques that can’t be easily reproduced on stage – like a backup orchestra. It may sound like prerecorded content – which might also be used – but sequencing software allows adjusting the tempo and changing other details live that can’t be done with recorded content.

A friend of mine, who is not a musician, composes entire songs with samples in sequencing software. He markets the resulting albums on-line and makes a small income from his hobby. Such software now has thousands of instruments available and more can be added.

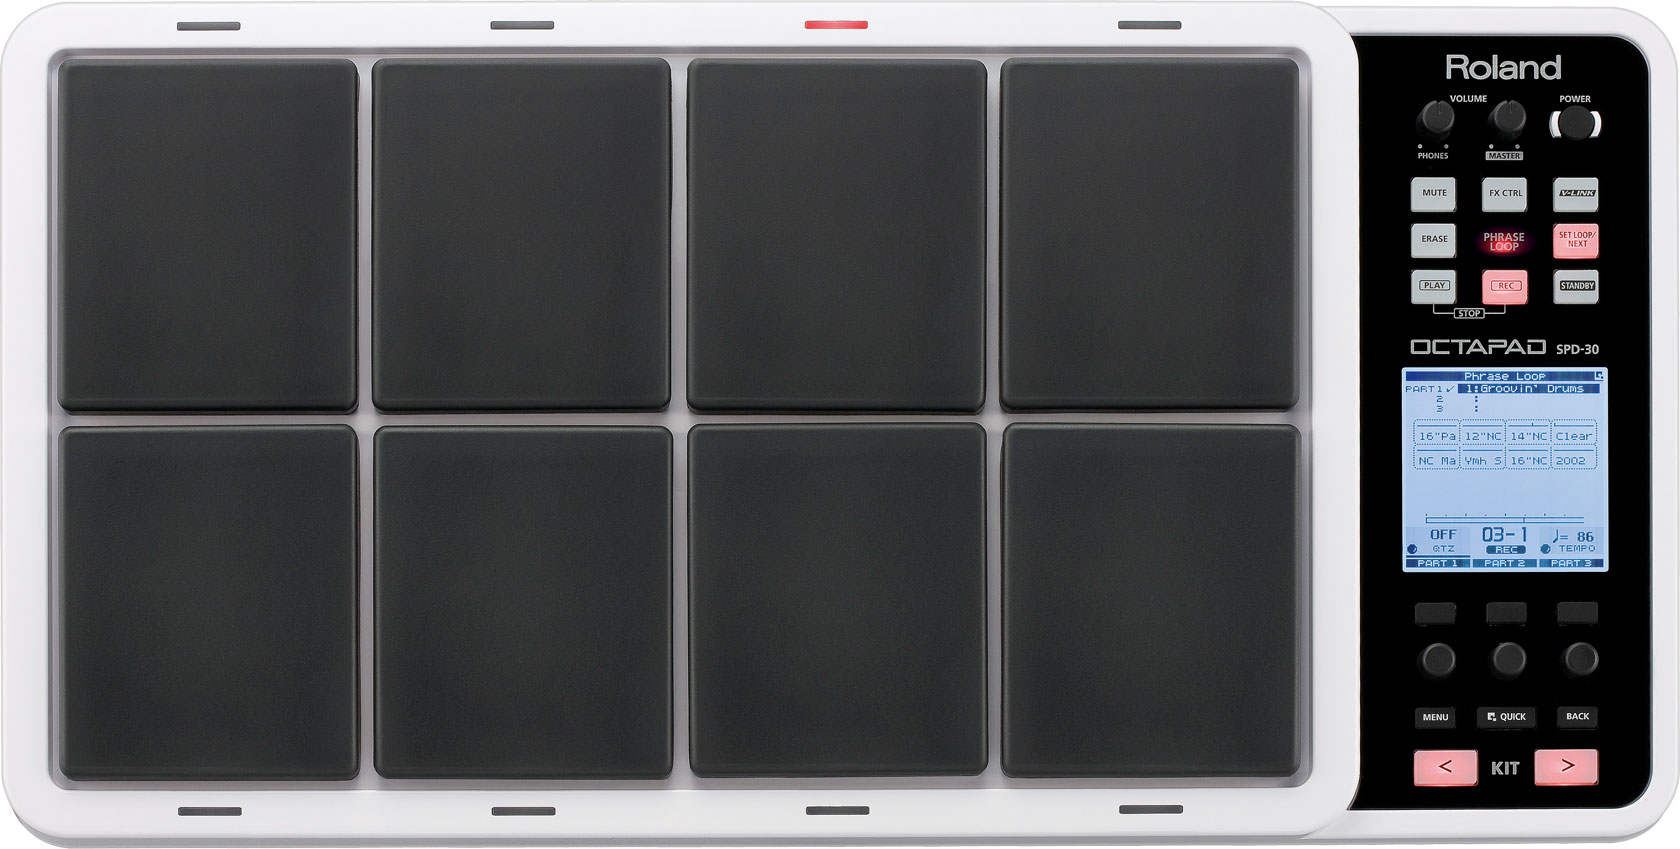
A parallel development was in instruments like drum pads where rubber pads could be used to trigger pre-programmed drum sets. This allowed drummers to expand their available drums but also to practice much more quietly.

drum pad
Similarly, piano keyboard controllers came out that were used to trigger software or other keyboards (via MIDI) rather than having built-in sounds. They were just a keyboard – like another form of your computer keyboard.

Over time, “pad controllers” were added to other instruments like keyboards as it was easier to play drums or trigger events with pads than keys. Then the controllers became instruments in themselves. They’re used to trigger digital events in computer software – either an individual sound sample (like playing an instrument) or an entire pre-programmed sequence.

nanopad
This shifted sequencing from a software process into a performance process. Recorded as a sequence, any errors can be easily corrected, samples upgraded, and so forth before recording a final song.

Unlike a typical instrument where this key is middle C, and that one is C5; pad controllers are entirely programmable. Any given pad can be anything. And then be something else for the next song. Better controllers have pads that are both touch and pressure sensitive so they can be quite expressive, giving contours to the programmed sound.

Controllers are also inexpensive compared to traditional instruments as the basics are simple. They’re a group of fancy buttons. All the sounds and intelligence are in the software. That’s where you do the programming, assigning sounds to keys. Then you can record the result – as a song or as a sequence to further polish.

In this example, notice how even voice is used as an “instrument” via pre-recorded samples. Also notice the sound samples being played have various lengths – some short, some longer. This is different from a normal instrument.

You have to have good spatial memory for this.
Here’s someone with 2:

A basic 16 pad unit with “lite” versions of the needed software is only about $30. It also works with pretty much any sequencing software like the free Hydrogen drums. (a dedicated drum sequencer, what might be called a software drum machine)

At first, people used pads for programming sequences. But pretty quickly, they began using them in live performance too. I saw a single live musician with a digital drum pad lay down the bass drum beat, then the next drum, then the next, building up over a dozen instruments, then jamming over the top. It has an interesting crescendo effect. One musician playing multiple parts in a kind of time dilation.

A related example:

The next stage of that was recording acoustic instrument samples live into a sequencer and then having that play back while they added other layers. The lines between live and recorded, acoustic and digital all blur.

Here’s an example – watch them use the foot pedal to mark the end of a sample recording. The pedal is carefully triggered so the sequence repeats from that point. (this is called looping) Notice a pad controller also being used but they’re using various triggers.

You don’t see pad instrumentalists on mainstream radio much yet. It’s a new style of musician – but they’re quite common on the net. It will be fascinating to see where this evolves.
David

Really Free Android Games

April 4, 2016 at 5:43 pm | Posted in Computers, Economoney, Games, Internet, Software | 3 Comments

I’ve been a fan of the Android smartphone platform, partly because of it’s roots in Linux. But I have to say that Google’s behaviour has me questioning that, treating their users as a commodity to be monetized. Not that the other platforms are above this. Some of the worst aspects of the modern Internet have become concentrated on the cell platform. The “swiss army knife” of telephones becomes a Truman Show experiment.

Google is in a major conflict of interest around advertising. Junk web sites have proliferated with their ad model and they highlight them in search results. Ads get more hits but search results get much less useful. Witness the growth of services like DuckDuckGo that allow you to use Google with less of the manipulation.

But on Android, you’re in Google world so it’s everywhere. When you browse apps in the Play store, the “Recommended” free ones can be some of the worst offenders and there’s no way to filter them out. Reviews are almost useless and some are gamed.

I’ve found myself adding apps like QuickPic (photo gallery) and AIMP (music) to avoid the pushy Google apps you can’t remove.

In the history of computer games, there has been a long record of shareware, trialware and freeware. The last became almost ubiquitous on Linux. But in the Android variant, it’s all about advertising. On the PC platform, it would be called Adware, considered by some to be malware.

This became highlighted for me when I installed a paid anti-malware app on my cell phone, the mobile ESET. ESET includes a review of app security. I was surprised by some of what I’d OKed. One of the worst turned out to be a flashlight app – evidently many of them are rife with user tracking. For a high-rated flashlight?

Apparently, as a way to promote development on the Android platform, Google has been promoting advertising for income. It is certainly fair for developers to earn money for their work. But the implementation has often been at the expense of the user and their experience. A great program spoiled by pop-ups and appalling ads. Part of the game becomes where to click to close the latest interruption. Not to mention reporting your cell phone activity.

On the web, I don’t mind advertising such as you see in magazines and print (aside from “native advertising“). But they didn’t leave it there – many sites went over the top with pop-ups, pop-unders, flashing text, video, and sound. The ads are often obnoxious or inappropriate and they load tracking beacons. I was obliged to turn the deluge off with Adblock Plus and related browser plug-ins. But turning down the volume is not so straightforward when it’s built into the platform.

To add insult, all of this cell advertising is using your paid data. When the ads include video, they can soak up an amazing amount of bandwidth. If you’re using a basic plan, you really DON’T want your apps using up your data.

Sure, some (but not all) will use wireless if available. But generally, I’m using games during a commute, in a waiting room or some such where wireless is not an option. And if it is, do I want to go to the trouble of connecting to a public hot spot just for the ads? And further, you’re now sharing user information on a public network.

This kind of activity also uses your battery charge up much faster than simply playing the game. Pretty lame to have your phone die over ads.

In summary – some of the motivation against using ad-supported free games:
– low quality ads: obnoxious and inappropriate ads the feature nudity, violence and fake warnings. It surprises me legitimate companies put themselves into this mix.
– heavy data usage by ads, especially video
– heavy power usage by ads
– gamed reviews – app reviews are largely useless and some apps game them by asking you to recommend them after a few levels, then they turn on all the crap.
– Play Store “recommended” apps are some of the worst offenders
– tracking of user activity, data, and calls – just watch those permissions when you install. Does this app need access to your call records, etc? Just say no.
– hidden payware where you have to pay to continue the “free” game
I’m sure many of you have experienced other tricks too

If you’re looking for high quality games to play as a pastime, I’d suggest looking for real reviews and buying them. But if you’re looking for a few apps to amuse you while waiting somewhere, you want simple and ad free.

Here is a list of free games I’ve found that are currently free of ads and obnoxious permissions. Quality is a little mixed but I enjoy a few of them. You can find them in the Play store.

Frozen Bubble (bubble matching)
OpenSudoku (you can download other games free)
Instant Sudoku
Trap!
Mastermind
Mines (Minesweeper)
ShokoRocket (maze game)
Vexed
Simple Missile Defense
Scrabble free

There was a great Solitaire game I used to use but they went advertising badly. Not aware of one now.
If you have any of your own suggestions, let us know in comments. No promotions, please.
David

Next Page »

Blog at WordPress.com.
Entries and comments feeds.